.NET Microservices : Service Discovery (Part 2: Reaching RabbitMQ through Consul)
Welcome back on this blog for the part 2 of my series regarding Service Discovery for .NET Services.
If you haven't seen the beginning of the series I recommand you check the first post, along with the base course from Les Jackson.
This post is part of a whole:
- .NET Microservices: Service Discovery (Part 1: Consul & RabbitMQ Deployment)
- .NET Microservices: Service Discovery (Part 2: Reaching RabbitMQ through Consul)
- .NET Microservices: Service Discovery (Part 3: Configuring Commands HTTP Service to Consul and consuming it)
- .NET Microservices: Service Discovery (Part 4: Configuring Platform gRPC Service to Consul and consuming it)
So — where were we? We deployed our Consul Server and we configured RabbitMQ to register to Consul.
What's left to to? Simply call the Consul Server from our .NET projects to get the required data to call.
I used some parts of TechyMaki's video about Consul, find out more here:
I will start with PlatformService because it was the first project we started working on. In the end I'll recap quickly how to do it for CommandService but it's very similar and probably a good excercise to try to do it without any help for the second one.
Installing Consul & Inject the Client
Nuget Package & appsettings.json
The very beginning is to download and install the Consul framework from the NuGet feed. I like to use the NuGet Gallery extension but you can also add it simply with the command line dotnet add package Consul from your PlatformService folder.
We will require two parameters for Consul: ConsulAddress and ConsulPort. Open your appsettings.Development.json and add the following parameters to your existing configuration:
{
  (…),
  "ConsulAddress": "localhost",
  "ConsulPort": "8500"
}Locally, we are using the LoadBalancer with localhost and the default port of Consul, 8500
You can already configure the appsettings.Production.json as we already have the necessary data to do so:
{
  (…),
  "ConsulAddress": "consul-clusterip-srv",
  "ConsulPort": "8500"
}We are simply using the consul-clusterip-srv wich is the routing we have configured inside our Kubernetes cluster.
While you're at it: you can remove the RabbitMQHost and the RabbitMQPort from both configuration files. We won't need it anymore, as Consul will give us the information.
Injecting our IConsulClient
We are going to use dependency injection to inject the IConsulClient, which is the client provided by our Consul NuGet package to interact with the server.
There is a few possibilities here, I chose to use a Singleton and to configure the Consul parameters from the Configuration on the go. For that, get to your Program.cs (or Startup.cs on .NET5.0) and add the service injection:
(…)

services.AddSingleton<IConsulClient, ConsulClient>(serviceProvider =>
{
    var conf = serviceProvider.GetService<IConfiguration>();
    var address = conf?["ConsulAddress"];
    var port = conf?["ConsulPort"];

    Console.WriteLine($"Configuring Consul at http://{address}:{port}");

    return new ConsulClient(config =>
    {
        config.Address = new Uri($"http://{address}:{port}");
    });
});

(…)Program.csWe're using the singleton constructor that provides us the ServiceProvider in order to get the parameters we defined in our appsettings (ConsulAddress and ConsulPort). The ? are null-check operators as .NET6.0 is sensitive on this topic.
At this point, don't hesitate to dotnet run your project to check you are correctly injecting your parameters and that your ConsulClient is correctly initialized.
Creating the IConsulRegistryService and its lifecycle
We're now ready to create the (.net) service that will help us find the other (consul) services through our Consul Server. We could use the client directly, but it will be clearly cleaner to create this RegistryService.
Create a new folder at the root of the PlatformService project, that we will name DiscoveryServices
Inside, we'll first create an interface we will name IConsulRegistryService.cs with the following code :
using Consul;

namespace PlatformService.DiscoveryServices;

public interface IConsulRegistryService
{
    AgentService? GetService(string serviceName);
}IConsulRegistryService.csThis will be a simple service that will return the configuration for a serviceName provided.
In the same folder, we will also create a class to store the keys we can use, with a file named ConsulServices.cs:
namespace PlatformService.DiscoveryServices;

public static class ConsulServices
{
    public const string RabbitMQ = "rabbitmq";
}ConsulServices.csAnd finally, our ConsulRegistryService.cs. This class will implement IConsulRegistryService and we'll inject two parameters in the constructor: our IConsulClient and the IWebHostEnvironment. I'll explain later why we need it.
Your file should look like this:
using Consul;

namespace PlatformService.DiscoveryServices;

public class ConsulRegistryService : IConsulRegistryService
{
    private readonly IConsulClient _consulClient;
    private readonly IWebHostEnvironment _webHostEnvironment;

    public ConsulRegistryService(IConsulClient consulClient,
                                 IWebHostEnvironment webHostEnvironment)
    {
        _consulClient = consulClient;
        _webHostEnvironment = webHostEnvironment;
    }

    public AgentService? GetService(string serviceName) {
		throw new NotImplementedException();
    }
}
We're going to implement this method a little bit later; right now let's focus on injecting and using this.
As always, let's get back to Program.cs (or Startup.cs) to create our Singleton. It's a basic init like we always did. As a measure of security, I always put it after its dependencies (so here after IConsulClient singleton definition):
(…)

services.AddSingleton<IConsulRegistryService, ConsulRegistryService>();

(…)Program.csAnd as simple as that, we have injected our service. Now let's use it!
Getting the RabbitMQ configuration
Now that we created our service, let's get back to the MessageBusClient where we did our RabbitMQConfiguration. Let's focus on the constructor, that's the only thing we'll need to change.
Right now your client should look something like this:
public class MessageBusClient : IMessageBusClient
{
    private readonly IConfiguration _configuration;
    private readonly IConnection _connection;
    private readonly IModel _channel;

    public MessageBusClient(IConfiguration configuration)
    {
        _configuration = configuration;
        var factory = new ConnectionFactory()
        {
            HostName = _configuration["RabbitMQHost"],
            Port = int.Parse(_configuration["RabbitMQPort"])
        };
        try
        {
            _connection = factory.CreateConnection();
            _channel = _connection.CreateModel();

            _channel.ExchangeDeclare(exchange: "trigger", type: ExchangeType.Fanout);

            _connection.ConnectionShutdown += RabbitMQ_ConnectionShutdown;

            Console.WriteLine("--> Connected to MessageBus");
        }
        catch (Exception ex)
        {
            Console.WriteLine($"--> Could not connect to the Message Bus: {ex.Message}");
        }
    }
(…)

}
MessageBusClient.cs (the old one)First of all we will need to inject our IConsulRegistryService to the constructor. You can also drop the IConfiguration: we won't need it anymore.
We are going to get the service informations from our RegistryService (Address & Port) and inject it instead of IConfiguration["RabbitMQHost"] (and port). Considering our service CAN be null (if there is none available), you should move your code inside the try-catch block and null-check your data, just like this:
public class MessageBusClient : IMessageBusClient
{
    private readonly IConsulRegistryService _consulRegistryService;
    private readonly IConnection _connection;
    private readonly IModel _channel;

    public MessageBusClient(IConsulRegistryService consulRegistryService)
    {
        try
        {
            var service = _consulRegistryService.GetService(ConsulServices.RabbitMQ);
            if (service == null)
                throw new ArgumentNullException(nameof(service));

            var factory = new ConnectionFactory()
            {
                HostName = service.Address,
                Port = service.Port
            };

            (…)
        }
        catch (Exception ex)
        {
            Console.WriteLine($"--> Could not connect to the Message Bus: {ex.Message}");
        }
    }
(…)

}
MessageBusClient.cs (the new one)We are simply calling the newly created service to find the RabbitMQ configuration.
At this point you can dotnet run your project, but you should get a NotImplementException from our new service.
Implementing the GetService method
Let's talk implementation. What we will need is to ask our Consul client for a healthy service. I won't get into details about service lifecycle, here we are only focusing on getting things done; this could be improved with more finesse.
To keep it simple, I also did not take into consideration any async method. Indeed, we are using our GetService(…) in a constructor so I used the .Result method to keep it synchronous. Not that clean, if we wanted to do something clean we would have to go further, but our mind is set on getting things done here so there will be room for improvement if you want to go to production.
Now the implementation looks like that:
public AgentService? GetService(string serviceName) {
    Console.WriteLine($"Looking for service {serviceName}");

    var serviceQueryResult = _consulClient.Health.Service(serviceName).Result;
    var nbServices = serviceQueryResult?.Response?.Length;
    if (nbServices > 0)
    {
        Console.WriteLine($"{nbServices} service(s) found");
        var service = serviceQueryResult?.Response[0]!;
        return service.Service;
    }
    else
    {
        Console.WriteLine($"Service not found");
        return null;
    }
}ConsulRegistryService.csSimply put: we call Consul for a Healthy Service matching the name, we return the first result. Again, a lot could be done to improve it but it's a decent implementation to start.
Now in theory we could test it all the way locally, but if we do we're going to hit a rock.
Remember when we defined our RabbitMQ configuration for Kubernetes? We did something that will actually be a problem for a local test:
apiVersion: v1
kind: ConfigMap
metadata:
  name: rabbitmq-config
data:
  enabled_plugins: |
      [rabbitmq_management,rabbitmq_management_agent,rabbitmq_mqtt,rabbitmq_stomp,rabbitmq_peer_discovery_consul].
  rabbitmq.conf: |
      log.console = true
      loopback_users.guest = false
      cluster_formation.peer_discovery_backend = consul
      cluster_formation.consul.host = consul-clusterip-srv
      cluster_formation.consul.svc = rabbitmq
cluster_formation.consul.svc_addr = rabbitmq-clusterip-srvrabbitmq-depl.yamlCan you see it?
…
…
That's right, we registered RabbitMQ with the rabbitmq-clusterip-srv service address. Now this won't be a problem in production, but it won't work locally because it's an internal address.
My solution here was to add a small snippet of code to rewrite addresses during development. It's not the best and we usually try to avoid this kind of workaround, but all the « proper » methods were furiously more complicated in my opinion than two lines of codes.
That's where our IWebHostEnvironment comes to light, with a final implementation looking like that:
public AgentService? GetService(string serviceName) {
    Console.WriteLine($"Looking for service {serviceName}");

    var serviceQueryResult = _consulClient.Health.Service(serviceName).Result;
    var nbServices = serviceQueryResult?.Response?.Length;
    if (nbServices > 0)
    {
        Console.WriteLine($"{nbServices} service(s) found");
        var service = serviceQueryResult?.Response[0]!;
        if (_webHostEnvironment.IsDevelopment())
            service.Service.Address = "localhost";

        return service.Service;
    }
    else
    {
        Console.WriteLine($"Service not found");
        return null;
    }
}
PHEW! Finally!
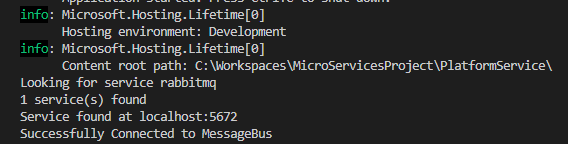
Now let's start our project with dotnet run, you should see something like this in your logs when you call for any method in the PlatformController (the reason is the singleton is initialized when injected, so you won't see it at startup):
Now all you have to do is rebuild your image: docker build -t xxx/platformservice .
Push it: docker push xxx/platformservice
And restart your deployment: kubectl rollout restart deployment platforms-depl
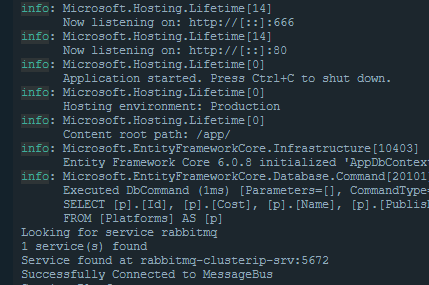
And you should see the same results with your Kubernetes API:
Now do it again with CommandService
Ready for a challenge? Let's do it again with CommandService: it's exactly the same.
- Add Consul to .net project
- Update your appsettings (dev+prod, remove RabbitMQ parameters and add Consul parameters)
- Create the
IConsulClientdependency injection and use the appsettings values - Create and implement the
IConsulRegistryService+ConsulRegistryService(andConsulServices) - Update the
MessageBusSuscriberto replace theIConfigurationhardcoded values of RabbitMQ by the call toIConsulRegistryService - Test locally
- Test with Kubernetes
Now that we have consumed our first service with Consul, it's time to get hard: we will now register our own services and consume them.
See you in the next post!
This post is part of a whole:
- .NET Microservices: Service Discovery (Part 1: Consul & RabbitMQ Deployment)
- .NET Microservices: Service Discovery (Part 2: Reaching RabbitMQ through Consul)
- .NET Microservices: Service Discovery (Part 3: Configuring Commands HTTP Service to Consul and consuming it)
- .NET Microservices: Service Discovery (Part 4: Configuring Platform gRPC Service to Consul and consuming it)