.NET Microservices : Service Discovery (Part 1: Consul & RabbitMQ Deployment)
Hey there, it's been a long time!
I have discovered a few monthes ago the AMAZING course by Les Jackson about microservices with .Net Core.
I cannot recommand it enough, it's a freaking gold mine and a pleasure to watch and to develop alongside this incredible teacher. And it's entirely free. For such a good material to be free is just an opportunity no-one should miss.
You can find it here and I strongly recommand to follow it:
Les Jackson finishes his course on final thoughts with what could be improved. Today I want to get into details with « Service Discovery » which is in my opinion the most relevant feature to add after the course. We're going to improve this course by including an Open-Source Service Discovery.
Amongst the choices, I found both Eureka (by Netflix) and Consul to be the best options. I chose the latter - Consul - for various reasons and we're going to implement it together.
This post is part of a whole:
- .NET Microservices: Service Discovery (Part 1: Consul & RabbitMQ Deployment)
- .NET Microservices: Service Discovery (Part 2: Reaching RabbitMQ through Consul)
- .NET Microservices: Service Discovery (Part 3: Configuring Commands HTTP Service to Consul and consuming it)
- .NET Microservices: Service Discovery (Part 4: Configuring Platform gRPC Service to Consul and consuming it)
These posts are starting right at the end of his course. I strongly advise you to do all the course before getting into my posts, but you can also find the whole content on GitHub. You can start from the repo but I will assume you have all the basics to continue this.
I should warn you that I did the whole course in .NET 6.0. There is not a lot of differences, but you might find a few new syntax code lines such as namespace xx; or = default! for non-nullable parameters. None of my code relies on .NET 6.0 so you should be fine if you're still on .NET 5.0 but you might have to update a few lines. Feel free to contact me if you have any issue.
Setting up Consul
I won't get into details of what Consul exactly is, I think you can find a lot on the internet explaining it better than me.
What you'll have to know is that it's basically a server that can register services with keys and routes which can be called by other services.
The main goal is to avoid configuring services with remote addresses of other services but rather configure services with their own informations for others to ask Consul for it.
First things first, we'll create a new deployment file in K8S : consul-depl.yaml. You should now be familiar with the yaml syntax but I'll explain a few things at the best of my ability.
There is 3 blocks, Deployment, Service (ClusterIp) and Service (Load Balancer). It's actually quite straightforward and very similar to what we did with RabbitMQ.
Deployment:
apiVersion: apps/v1
kind: Deployment
metadata:
  name: consul-depl
spec:
  replicas: 1
  selector:
    matchLabels:
      app: consul
  template:
    metadata:
      labels:
        app: consul
    spec:
      containers:
        - name: consul
          image: consul:latest
          ports:
            - containerPort: 8500
              name: consul-tcp-port
            - containerPort: 8600
name: consul-udp-portconsul-depl.yamlAgain, It's pretty similar to RabbitMQ, the only difference is the port configuration. Consul uses 8500 for TCP and 8600 for UDP. I found other ports for other purposes, but we'll be fine with these two.
Here are the services (ClusterIp and LoadBalancer), I won't get into details because it's pretty straightforward: we're configuring a ClusterIp to route within Kubernetes and a LoadBalancer to access it.
---
apiVersion: v1
kind: Service
metadata:
  name: consul-clusterip-srv
spec:
  selector:
    app: consul
  type: ClusterIP
  ports:
    - name: consul-tcp-port
      protocol: TCP
      port: 8500
      targetPort: 8500
    - name: consul-udp-port
      protocol: UDP
      port: 8600
      targetPort: 8600
---
apiVersion: v1
kind: Service
metadata:
  name: consul-loadbalancer
spec:
  selector:
    app: consul
  type: LoadBalancer
  ports:
    - name: consul-tcp-port
      protocol: TCP
      port: 8500
      targetPort: 8500
    - name: consul-udp-port
      protocol: UDP
      port: 8600
targetPort: 8600consul-depl.yamlAll we have to do is apply it with the classic kubectl command: kubectl apply -f consul-depl.yaml.
You should now be able to browse http://localhost:8500/ and get something like that:
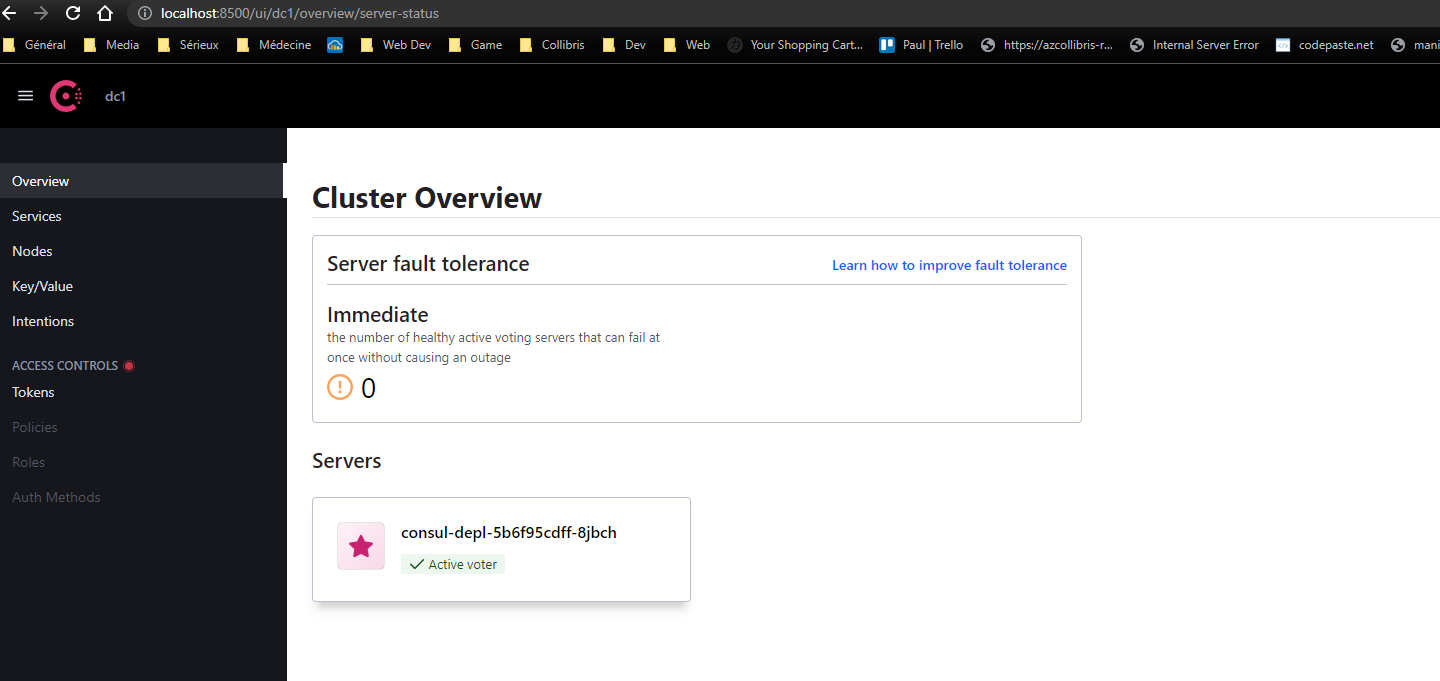
If that's the case, Congratulations! You have configured the Service Discovery Server we'll be using for the rest of the posts.
Next up, we'll be setting up RabbitMQ to register to Consul.
Configure RabbitMQ to prepare for Consul
Now this part is a bit tricky, because we're going to update our RabbitMQ deployment to set it up to connect automatically to Consul.
The good news is, RabbitMQ supports Peer Discovery Using Consul with a plugin! All we have to do is set up the configuration files to automatically register. The bad news is, we're going to have to configure a bit more as we're not going to use the default settings anymore. Nothing too tricky but it was a bit daunting to do.
This will be done with a new configuration element of Kubernetes: ConfigMap. Let's open rabbitmq-depl.yaml to add the following config map:
---
apiVersion: v1
kind: ConfigMap
metadata:
  name: rabbitmq-config
data:
  enabled_plugins: |
      [rabbitmq_management,rabbitmq_management_agent,rabbitmq_mqtt,rabbitmq_stomp].
  rabbitmq.conf: |
      log.console = true
loopback_users.guest = falserabbitmq-depl.yamlWhat you're seing here is the default configuration I found for RabbitMQ. It already embeds a few plugins, and it is configured to log to console and to allow the guest user to go through loopback.
If you fail to configure the guest user, you won't be able to connect to the management page and you'll get the following message: users can only log in via localhost.
WARNING: The dot (« . ») at the end of enabled_plugins is mandatory. Failing to add it will prevent you from starting RabbitMQ.
Next up we're going to configure the Deployment to access to these elements of configuration, like that:
apiVersion: apps/v1
kind: Deployment
metadata:
  name: rabbitmq-depl
spec:
  replicas: 1
  selector:
    matchLabels:
      app: rabbitmq
  template:
    metadata:
      labels:
        app: rabbitmq
    spec:
      containers:
        - name: rabbitmq
          image: rabbitmq:3-management
          ports:
            - containerPort: 15672
              name: rbmq-mgmt-port
            - containerPort: 5672
              name: rbmq-msg-port
          volumeMounts:
            - name: config-volume
              mountPath: /etc/rabbitmq
      volumes:
        - name: config-volume
          configMap:
            name: rabbitmq-config
            items:
              - key: rabbitmq.conf
                path: rabbitmq.conf
              - key: enabled_plugins
path: enabled_pluginsrabbitmq-depl.yamlWe added the volumes property, which maps the rabbitmq-config to two files, rabbitmq.conf and enabled_plugins. These are the informations we put earlier in the file with the ConfigMap.
Then we added the volumeMounts property to the container, which maps the config volume to /etc/rabbitmq, which is the folder where RabbitMQ will find its config.
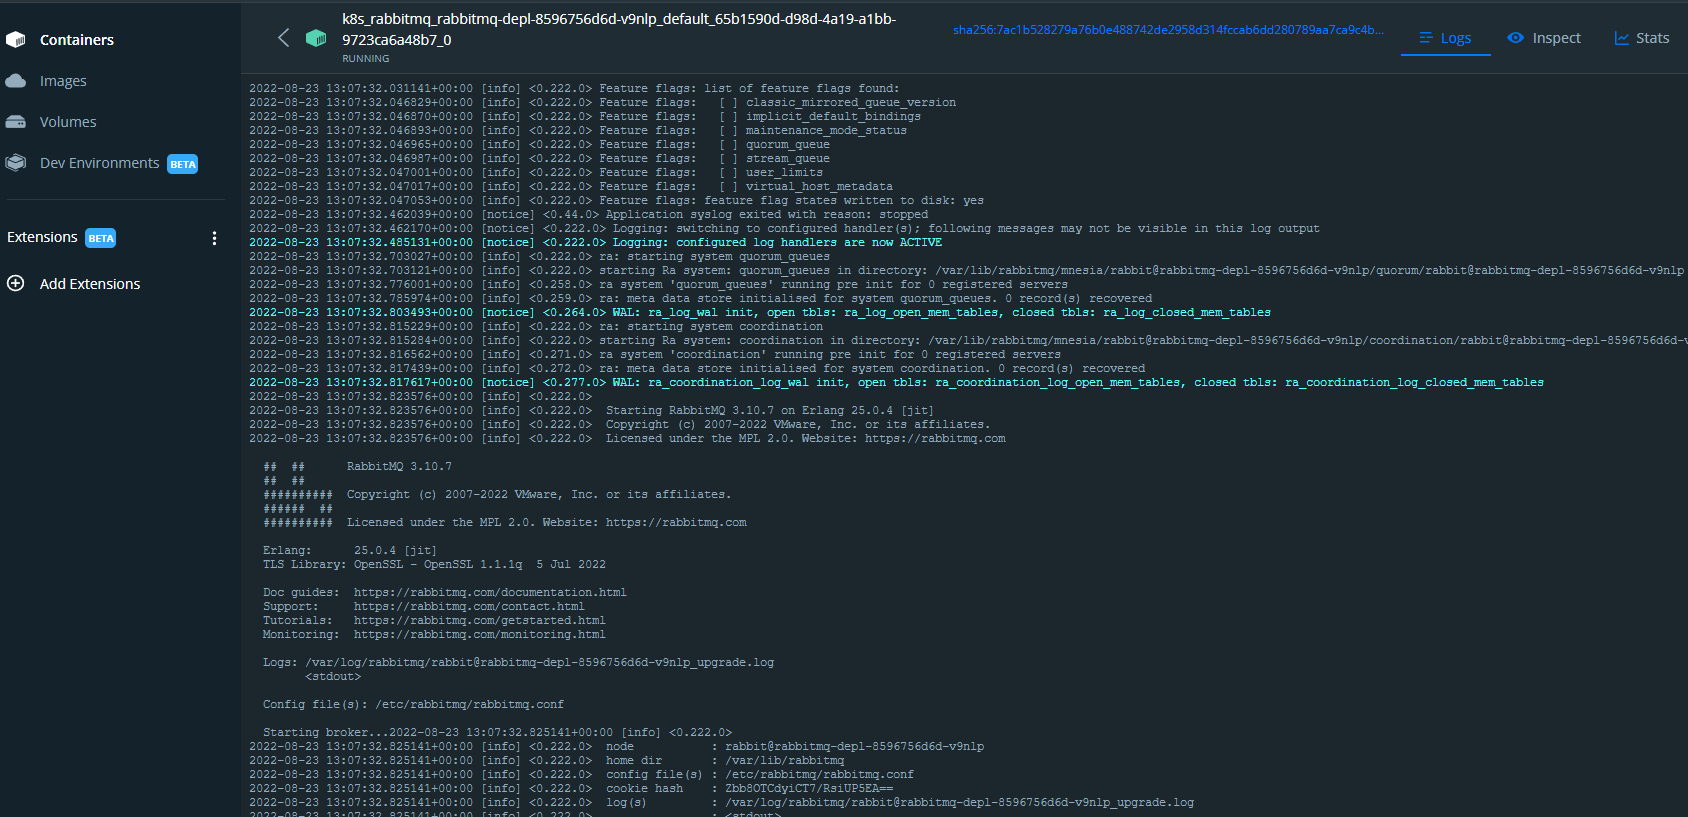
Just reapply and restart with kubectl apply -f rabbitmq-depl.yaml and kubectl rollout restart deployment rabbitmq-depl
Everything should be the same as before. If you have an error at this point, fix it first by checking the logs of the RabbitMQ container through Docker Desktop (or with the console):
Configure RabbitMQ with Consul
Now that you have the few elements required to configure RabbitMQ, we're going to add the rabbitmq_peer_discovery_consul plugin and its configuration to the ConfigMap of rabbitmq-depl.yaml (update it, do not create a new one):
apiVersion: v1
kind: ConfigMap
metadata:
  name: rabbitmq-config
data:
  enabled_plugins: |
      [rabbitmq_management,rabbitmq_management_agent,rabbitmq_mqtt,rabbitmq_stomp,rabbitmq_peer_discovery_consul].
  rabbitmq.conf: |
      log.console = true
      loopback_users.guest = false
      cluster_formation.peer_discovery_backend = consul
      cluster_formation.consul.host = consul-clusterip-srv
      cluster_formation.consul.svc = rabbitmq
cluster_formation.consul.svc_addr = rabbitmq-clusterip-srvrabbitmq-depl.yamlThe configuration should be:
cluster_formation.peer_discovery_backendset toconsulcluster_formation.consul.hostshould be the ClusterIp you set for Consul, hereconsul-clusterip-srvcluster_formation.consul.svcis the name we'll use to find our service, hererabbitmqcluster_formation.consul.svc_addris the address we want to share for RabbitMQ sorabbitmq-clusterip-srvif you followed the course
Again, just reapply and restart with kubectl apply -f rabbitmq-depl.yaml and kubectl rollout restart deployment rabbitmq-depl
Now if you browse your Consul Management page, you should now be able to see RabbitMQ in the services (alongside with consul, you should have two):

Alright! Be reassured, this was by far the most complicated part of the tutorial in my opinion. You have now configured RabbitMQ to register to Consul, all we have to do now is to update our PlatformService and our CommandService to ask Consul for an address (as opposed to setting it up ourselves).
I was planning on doing it on the same blog post, but let's be honest I think this one is already compact enough.
See you in the next post!
This post is part of a whole:
- .NET Microservices: Service Discovery (Part 1: Consul & RabbitMQ Deployment)
- .NET Microservices: Service Discovery (Part 2: Reaching RabbitMQ through Consul)
- .NET Microservices: Service Discovery (Part 3: Configuring Commands HTTP Service to Consul and consuming it)
- .NET Microservices: Service Discovery (Part 4: Configuring Platform gRPC Service to Consul and consuming it)